Photoshop stands out as a powerful program that empowers you to create captivating artwork from your images. Among the plethora of realistic effects you can explore one fascinating option is the cartoon effect. This transformative technique converts your photos into stylized drawings.
In this article I will guide you through a six step process using objects and filters to turn an image into a cartoon, within Photoshop. Additionally I’ll share some tips to enhance your cartoon effect and bring it to life with a touch of realism.

Prepare the Image
Let’s get started by preparing the image for the desired cartoon effect. While any photo can be used, opting for high resolution images, with defined contrasts and sharp details tends to yield the results. Feel free to resize or crop the photo according to your dimensions.
To prepare the photo, you’ve to duplicate the layer and convert it to a smart object. This’ll allow you to implement filters and adjustments, meaning you can edit them after without affecting the actual one.
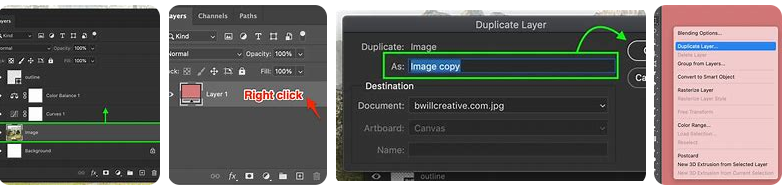
- Open your photo in Photoshop and ensure it’s the background layer. If not, right-click on the layer and select Convert to background layer from the menu.
- Press Ctrl + J to duplicate the layer. You can rename it as a cutout for organization purposes.
- Press on the duplicated layer & select convert to smart object. You’ll see a small icon on the thumbnail indicating that it’s a smart object.

Apply the Cutout Filter
In the next step apply the cutout filter to the smart object layer. The cutout simplifies the shapes and colors, giving it to poster-like touch.
- Ensure the cutout layer is selected and go to filter than gallery from the menu.
- In the gallery window, choose the artistic folder and select the cutout filter.
- On the other side, you’ll have some features to set the filter. The number of levels how many colors are utilized in the photo and how smooth the edges are in the image.
- Click Okay implement the filter and close the filter gallery menu.
Duplicate the Filter
The cutout filter provides you with a fine cartoonish effect, but it might also cut some important details from your photo. To fix this, you can duplicate the filter and set it to bring back its actual details.
- Press Ctrl + J to duplicate the cutout layer.
- Double-click on it on the details layer to open the filter gallery menu again.
- In the filter gallery menu, lower the level of edge simplicity to bring back details. You can also set other details as well if you want, but carefully.
- Press Okay and apply the changes.

Limit the Changes
Now you’ve 2 layers with different details. The details layer has more details, but it also has artifacts and noises. The cutout layer has less, but it also has cleaner and smoother edges. To combine the best, you have limited the changes to only the parts that need more details such as the hand and the face.
- Ensure the details layer is selected and apply a layer mask by clicking on the add layer mask. You’ll see a white thumbnail to the layer, showing that the layer mask is applied.
- Pick the brush tool and adjust the foreground shade to black. Pick a soft round brush with level capacity level of around 20% with a medium size.
- After selecting the layer mask, paint over the parts that need to hide from the details layer, such as clothing, hair, or background. You’ll see the cutout layer shows through the masked areas, making a cleaner or smoother cartoonish effect.
You can also turn the foreground color to a white shard and paint over the parts that you need to reveal from the details layers such as nose, eyes, fingers, and mouth. You can set brush capacity, hardness, and size to get the best outcome.

Apply One More Layer
The cartoonish effect is almost done, but here you can add another layer to improve it and make it natural. You can apply the poster edge filter to add some contrast and textures to your photo, offering it a more hand-drawn look.
- Click Ctrl + Shift + Alt + E to merge every visible layer into a new one.
- Get a filter than gallery from the menu choose the artistic folder and select the poster edges filter.
- On the ride side of the screen, you’ll see more options to fix the filter such as how thick the edges are, how dark the edges are, and more. You can adjust it with various values to get the right effect you need.
- Press Okay to apply the changes and close the filter gallery menu.
Final Adjustments
Lastly we’ll make some adjustments to refine the brightness, color and contrast of your photo. These tweaks will contribute towards creating a vibrant final result. You can utilize the adjustment layer to do this all, meaning you can edit them later when you want without affecting the actual photo.
- Press on Create new fill at the bottom of layers and select Saturation/Hue from the menu. A new adjustments layer will appear over the poster edges, with a properties panel on the right side of the page.
- In this properties panel, increase the image saturation level to boost the colors. For this instance, we’ll use 25 values. You can also set the lightness and hue values if you need but don’t forget carefully.
- Press on Create New Fill again and select Contrast/Brightness from the menu. One more adjustment layer will appear over the Hue/saturation layer, with a properties window on the right part of the screen.
- In the properties panel, you can increase the contrast and brightness levels to make your photo more crisp and bright. For this instance, we’ll use 10 values for both. You can set the other if you need to, but don’t overdo it, it’ll hurt the final result. Now, that’s it.
You’ve successfully turned your image into a cartoon in Photoshop. You can save your photo as PSD to preserve the layers or as a PNG or GPJ to share it where you want. You can also try this method on other images experiment with various settings and apply filters to make your cartoonish effects.